In the miniature painting community, there are two broad types of approaches to representing metallic surfaces, “non-metallic metal” (nmm) and “true metallic metal” (tmm). In non-metallic metal, the painter represents a metallic surface without using metallic paints by painting the reflections by hand, in the manner of 2-dimensional art. True metallic metal, in contrast, involves the use of metallic paint, which contains little bits of mica or other reflective material to gain a metallic look. I have no interest in debating which is “better”; the two techniques have very different aesthetics and lend themselves to different styles, but both can look amazing when done well. Personally, I have used both in my work [tmm, nmm], although generally I think I get better results when using metallic paints.
In this article I will share my standard technique for painting metals with metallic paints, by painting all of the metals on a bane thrall from start to finish. (Why do all of my tutorials seem to be on Cryx minis?)
Step 1: base coat
Just like painting almost anything else, I started with a nice solid base coat. In this case I base-coated most of the armor plates with P3 molten bronze, and used P3 pig iron for the chainmail, axe blade, and other places where the armor needed a contrasting region. There are also a few places where armor plates have a decorative edging, which I painted with P3 solid gold. This is one layer, which was almost enough. In retrospect I should have used a second layer for the axe.
Throughout this tutorial I will be using P3 paints. If you are not familiar with this paint line and want to know what the colors are, use this reference. There are also various conversion cheat-sheets on the web between P3 and other paint lines, such as this one if you want to convert to GW paints.
To get the best result, start with a black undercoat (or other dark color). Here I’ve done that by priming black, which is best for minis with a large amount of metal. When I prime white, I normally paint areas which are going to be metal black before applying metallic paints.
When painting metals, after you paint the base coat, and before you do anything else, put your mini on the table, put a lamp directly above it to simulate the sun, then study where the light reflects and the metals are brightest, and where they are dullest. This will help you when it’s time to shade and highlight.
Step 2: glaze
I always like to start painting metals with a glaze over all surfaces. This helps define detail a bit better generally, and also tones down the reflectiveness so that I can place reflective highlights in the areas where I want them, rather than being everywhere equally. To glaze the bane thrall, I used a mixture of water, P3 brown ink, P3 coal black, and Golden fluid matte medium.
By the way, if you don’t already have matte medium, get some. It’s great stuff, which I use for many different purposes. You should get it at an art store. Liquitex and Golden are both good brands, and it will cost about $10 for 8 fl. oz. (240 ml), which is basically a lifetime supply for a miniature painter. It’s also about five times cheaper than buying it in 17 ml bottles from Vallejo, so don’t do that.
I used enough brown ink so that the mixture was more brown than blue (coal black is really a dark turquoise). For glazing the silver metals, I could have gone either way, but for the orange metals I wanted a brownish shade, and it was easiest to just use the same color everywhere.
There’s some disagreement among miniature painters on the difference between a “glaze” and a “wash”. I added enough water to this mixture so that it flowed pretty smoothly, but not so much that it was hard to control. I covered all of the metal surfaces on the model, but I didn’t let it pool anywhere when I applied it. To me, that makes this a glaze rather than a wash.
Ignore the shading at the bottom of the axe blade. That properly belongs to step 3, I was just a bit overeager on the shading. Sorry, I guess I just got a bit too into it!
Step 3: shade
Figuring out where to place the shades and highlights is the trickiest part of painting metals, because it’s not quite like non-reflective surfaces. You want to place your highlights where reflections would be on actual metals, similar to what you do when using the non-metallic metal technique. Nmm is rightfully considered to be one of the trickiest techniques in mini painting, because it’s so hard to get the placement of highlights to look right.
Luckily, when you use metallic paints, you have two big advantages over someone painting nmm. First, since you are using metallic paints, the result will still look metallic even if you don’t get the placement of the highlights and shading quite right, whereas nmm can easily just look terrible. Second, you can actually see reflections from the metal flake in your paint, and use that as a guide to place highlights and shadows in the right places. Remember the tip at the end of step 1? This is where it pays off. This experience will also help if you ever try nmm, and if you do have experience with nmm, that will really pay off here.
I began shading with the same mixture of coal black and brown ink I used for step 2, but with only a small amount of the water + matte medium, less than I used for the glaze. This is still a bit translucent, which helps with smooth transitions, but more opaque than the glaze, which helps me build up shadows more quickly. I applied this mixture, again as a glaze, but a much more focused one in specific areas. I shaded:
- the very front and back edges of the shoulder plates,
- parts of the axe blade,
- the sides of the leg plates,
- the chainmail under the leg plates,
- the sides of the breast plate, and
- the sides of the arms and between the fingers.
In a small number of places I applied a further shade with the same mixture plus a small amount of P3 thamar black (pure black).
Since I am base-coating and highlighting with metallic paints, but shading with non-metallic paints, this technique is sometimes called “demi-metallic.”
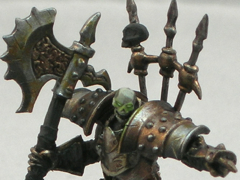
Step 4: highlight
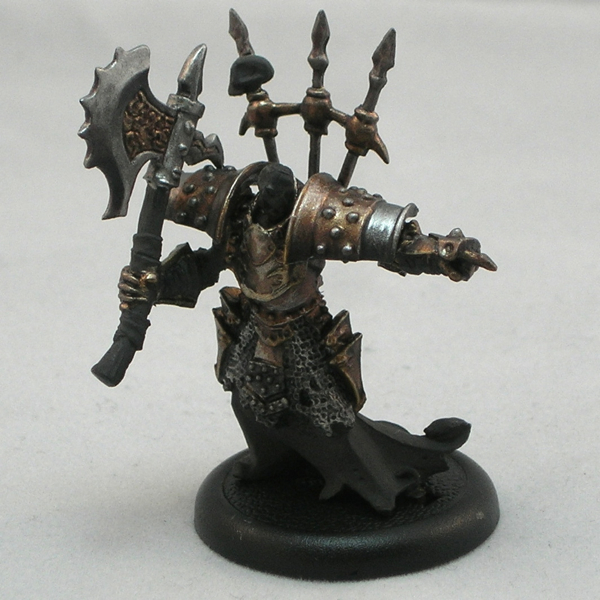
This is the inverse of step 3, so keep all of the same advice about placement of highlights and shadows in mind. I put a bright highlight anywhere the metal would be reflecting the sun, such as the tops of the armor plates, the top of the axe, tops of rivets, and anywhere an edge would catch the light. I also put a highlight, but not such a bright one, where armor would reflect light from the ground. This included the bottom of the lower part of the breast plate, and downward facing edges generally.
I put three levels of highlights on the metals. The first was the original base color (molten bronze or pig iron, depending on the area), to restore the original level of shininess before the glaze in step 2. For the second highlight, I mixed P3 quick silver with the base color. For the final highlight, I used pure quick silver to highlight the silver areas, and a mix of quick silver and solid gold for the bronze areas.
This is a good place to stop if you want clean metals, or want to get a good result without spending too much time. If I were painting up an army, I might stop here. It’s also a good starting point for further refinement in whichever direction you choose. You can age the metals, add dirt + grime, add lighting effects, or do whatever your imagination desires.
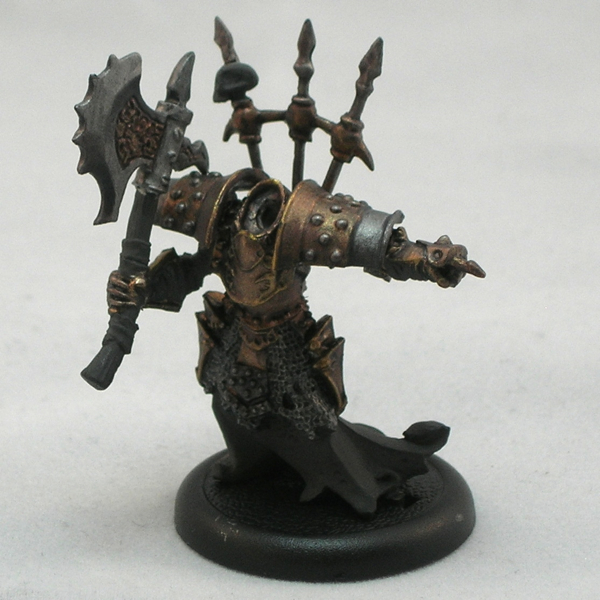
The next two steps are both optional, and show one direction you can go from this point. For a bane thrall, especially a lieutenant, I imagine a centuries-old warrior unearthed from an ancient crypt. His armor should show its age, and the magic of his reanimation.
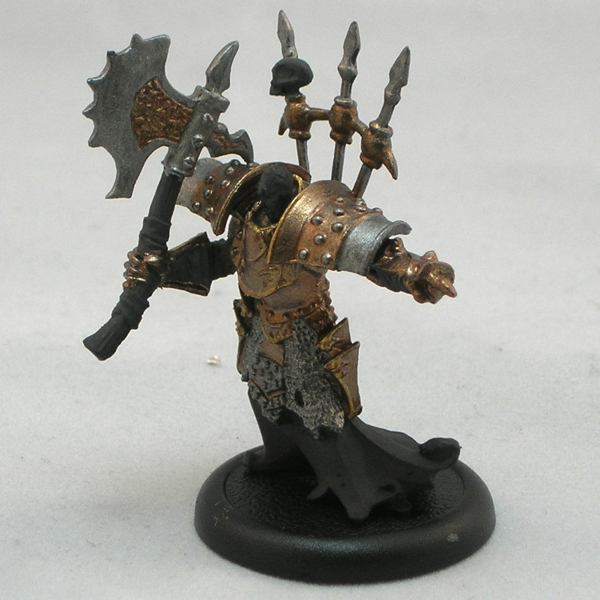
Step 5: Battle damage
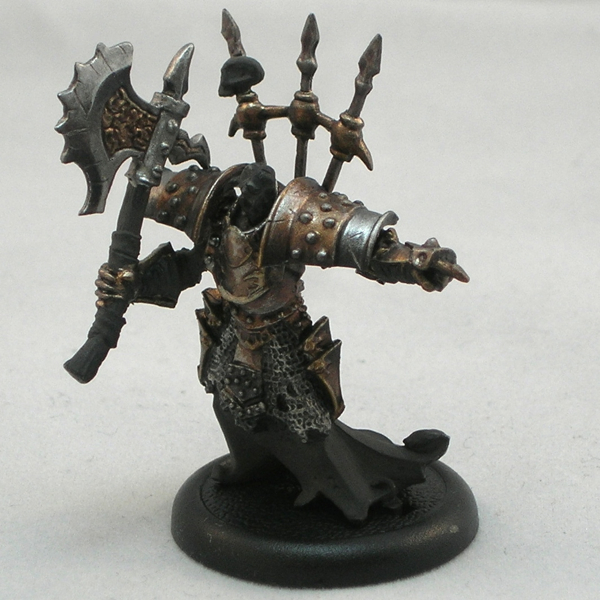
To add scratches and dents, apply fine lines of quick silver with a fine-tipped brush. You want to be fairly random about this, but also focus on areas which would be most likely to get damaged, such as weapon blades and prominent bits of armor. For deeper scratches, and a fine line of your shade color (not pure black) just above the scratch. I had some of the brown ink + coal black + medium mixture from steps 2-3 on my wet palette, which is nice and thin and flows well, making it easier to apply a fine line with it.
You can also “cheat” at this stage: if there’s any spot on the miniature where the paint is not as smooth as it should be, or a blend is not as smooth as it should be, or there’s a defect in the miniature sculpt or cast that you didn’t fix when prepping the mini, you can often hide the flaw with an appropriately placed scratch. I love doing this! Go back to the picture in step 4, and try to identify the areas where the blending is most messy or abrupt (a good example is the silver part of the shoulder pad). How many of these do you see that have been “fixed” by painting a scratch over them?
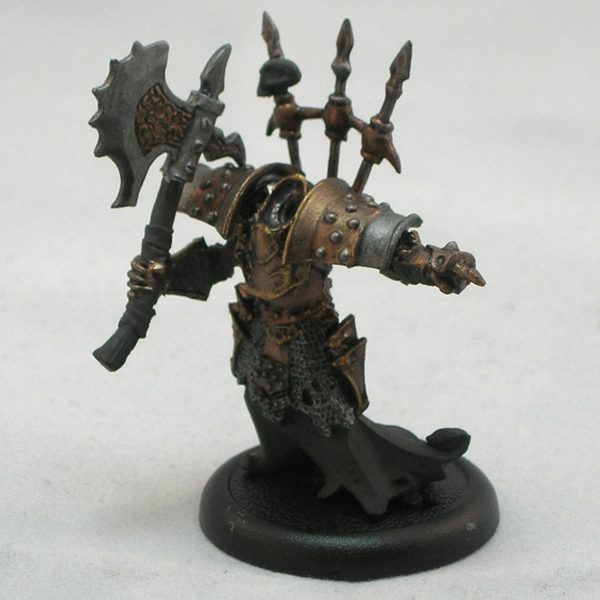
Step 6: final details
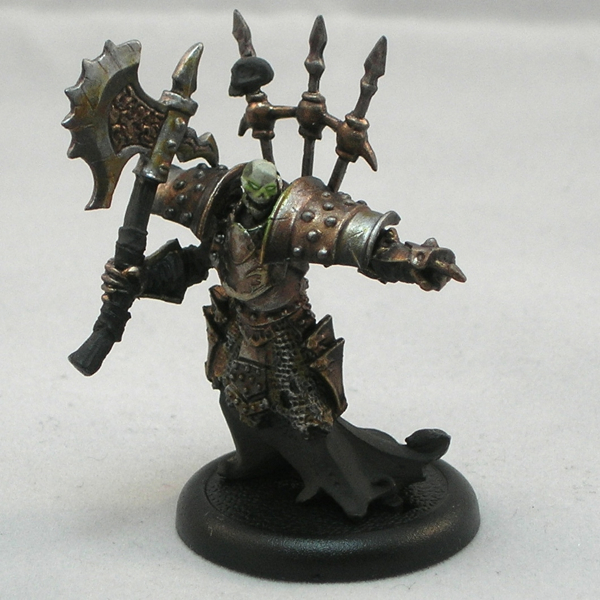
I made three main changes at this step. The first was adding rust to the silver metals. I used a combination of P3 yellow ink, P3 brown ink, P3 Khador red base, and water. This produces a very thin, translucent color, which I applied very gently with the tip of my brush to create a blotchy appearance in places where I wanted rust. I paid special attention to areas one would expect to accumulate rust, such as around the screws in the axe blade and the chainmail (I hear that stuff rusts likes nobody’s business!) I could also have corroded the bronze metals, but decided that verdigris wasn’t part of the color scheme I wanted.
The second change was refining the highlights and shading on the chainmail, since it didn’t look quite right to me. With an overhead light source, you would expect the top and bottom of the rings to have the brightest reflections, less so the sides. So I added some extra shading to each row where the middle of the rings are, and some extra highlighting where the top and bottom of the rings are.
The last change was a reflection from the thrall’s glowing green eyes, which you can see as a bright green line on the edge of the shoulder plate. I also had to paint the skull with the glowing eyes so the glow effect would make sense, which is the one deviation I took from my original plan to only paint the metals.
Total working time: ~2.5 hours (not counting time spent taking photographs).
Very nice tutorial! Thanks!
Thanks! This is the first thing I’ve read about mini painting that made real sense. And you clarified the idea of glazes for me more than articles specifically about glazes.
This amazing, thanks a lot taking time making a tutorial.
Never thought of washing before shading, and do a local shading..
Usually my metals loooks to uniform, I can’t see the contrast much when painting with TMM, and it often looks messy when dry :/
Guess I’ll try your techniques when I’ll have some time :p
Note : verdigris < sounds like it's derivated from french "Vert de gris" :p
Yes, it comes from the French term, which interestingly is a corruption of vert de Grèce, “green of Greece.” https://fr.wikipedia.org/wiki/Vert-de-gris
Another tip is if you prime with a shiny primer like Vallejo model color. Its plenty reflective to see where the light hits, which helps when you’re doing something like a knight that is all one color, the contrast is greater. Take a photo and keep it handy.
Good suggestion. That would be similar to my recommendation to do this right after you basecoat the metals.