Never be afraid to paint outside the lines

Category: Workbench (Page 2 of 2)

Works in progress

From the workbench: Tribe Chief Morrow, part 1

Last weekend I received a nifty little package from Germany. Inside was Forged Monkey’s Tribe Chief Morrow bust, a sweet little gorilla bust sculpted by Raffaele Picca, who is a great sculptor in addition to being one of my favorite painters. The cast was amazingly clean, with only one small bubble and almost no mold lines. Cleanup took only ~15 minutes, and I have very high standards for cleaning a cast before I start painting. I was so excited I started painting at once.

Tribe Chief Morrow - starting with the face

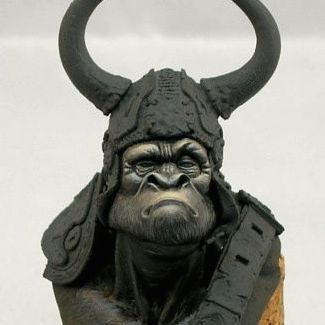
This is the first mini I’ve primed black in a long time, but given the black gorilla skin and many metal areas, it seemed convenient. I started with the face, as that’s the most important thing to get right on any figure, but especially a bust. I always like to find relevant reference material before I start painting, and for this bust, I was inspired by this adorable baby gorilla.

Tribe Chief Morrow, step 2 (right)

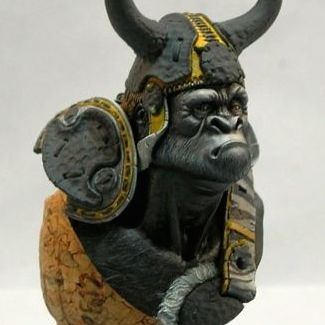
I originally went with red for the leathers, but wasn’t happy with how it looked and switched to yellow. It still looks a bit odd, but I think that once the metals are painted it will fit much better, and provide a nice warmth contrasted with the black. Of course, this was when I started kicking myself for priming black, but a few coats of menoth white highlight provided a good base for the yellow.

Tribe Chief Morrow, step 2 (front)

Zebra-skin provides striking patterns, and seemed appropriate for a gorilla chieftain. The larger stripes are how most of the body looks, and the finer stripes underneath are from the zebra’s head. No Zebras were harmed in the production of this blog post.

Tribe Chief Morrow, step 2 (left)

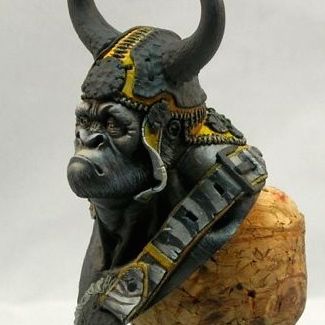
This guy is incredibly fun and quick to paint. I highly recommend picking up a copy for yourself!

From the workbench: “2084”, part 2

Yes, that’s a 10mm tall portrait of Edward Snowden.

2084-base-1

I imagine Lisbeth inhabiting a dystopian future with constant worldwide surveillance. I decided to cover the concrete blocks she’s flying over with graffiti protesting that situation.  The front says “Snowden ‘never forget'”, “You call this democracy?” and “The NSA is watching.”

2084-base-2

On the back you can read “Always use Tor” (with the Tor logo), “Don’t drone me bro,” and “xfmro77i3lixucja.onion,” which is an onion address for the Imperial Library of Trantor. In addition to being a reference to Asimov’s Foundation series, the Library of Trantor is an online collection of DRM-free digital books. (I really wanted to use an address for Wikileaks instead, but sadly they don’t seem to have a functional onion address right now.)

This graffiti was partially inspired by the 8.8.8.8 graffiti Turkish citizens used to evade the DNS block Turkey placed on Twitter last spring. I imagine citizens in a future Orwellian society using Tor to keep websites up and available despite state attempts to take them down, and using graffiti to tell each other how to access them.

2084-base-4

The sign says, “No privacy by order of the National Surveillance Agency”. Originally I painted the sign as “No entry by order of the National Security Agency”, and then painted over “entry” and “Security” as if someone had graffitied over an official sign.

2084-base-3

The portrait of Snowden was the most time-consuming part of the graffiti. I copied Laura Poitras’ well-known portrait of the whistleblower. (Used under CC-BY license.)

snowden

I think I made a pretty good likeness, although when I put them side-by-side like this, I see a few details I need to fix.

snowden_portrait_comparison

Parachute pants!

I’m super excited about my current project, which will be titled “2084” for reasons which shall soon become apparent. The figure is Lisbeth, by Studio McVey. This is the second time I’ve painted this figure. She’s a total kick to paint—I love the gigantic parachute pants, and there are lots of surfaces which just scream for freehand. Plus, I gave my first copy away, so I wanted a second to keep.

cypherpunk1


Starting with the prep work. My cast had a bit of an offset running between the folds in her pants, which was a bit of a pain to clean up.

cypherpunk4


I also decided to do some minor conversion work. Lisbeth comes with a backless tube-top-like-thing which I don’t much like, so I turned it into a full (if short) shirt. I also reshaped her hover-board into something a bit more snowboard and less surfboard.

cypherpunk2


I added a sign to the base, and started penciling in the graffiti I plan to paint. I smudged some of it with my thumb, but the face you see if going to be a portrait of a guy with a goatee and glasses.


cypherpunk3

cypherpunk5

cypherpunk6


The red is a lot more vibrant than it looks in these photos. I’ll try to come up with some better ones, later.

cypherpunk7


Old concrete usually has different colored stains, which I’ve tried to simulate here. It won’t be terribly visible once the graffiti is added, but will help the whole thing be a bit more realistic.


cypherpunk8


At this point you can probably guess who the portrait is, and why the title is “2084”.

From the workbench: Ar-Fienel, part 1

I wanted to share my current WIP, even though it doesn’t have any paint on it yet, because I’m very pleased at how it’s coming so far.

Ar-Fienel WIP 1 - right


The base is finished at this point, so the only thing left to add is paint.

Ar-Fienel WIP 1 - right front

One of my favorite things about the base is how it has very different silhouettes from different angles.

Ar-Fienel WIP 1 - front

For the base, I used:

  • Resin cube—from Secret Weapon.
  • Cork tile—I really like using this as a structural base, even in cases like this where it will all be covered.
  • Plastic card—textured for the stone blocks, and smooth for the outer edges.
  • Resin bits—stonework faces from Scibor Miniatures and some broken pottery from Baueda Wargames.
  • Brass-etch leaves.
  • Brass chain.
  • 2-part epoxy putty.

Ar-Fienel WIP 1 - left front

I can’t wait to add paint, but I want to finish some other projects first (like the steampunk bust which is still in progress).

From the workbench: steampunk Leia, part 2

I’ve made a bit more progress, and taken a few more photos.

Steampunk Leia WIP 2 - front

You can see the lighting effect a bit better now. I’m really happy with how that came out. She’s still WIP, but at least there’s no more primer visible (except a few spots where the paint rubbed off, but those will get fixed).

Steampunk Leia WIP 2 - left

Steampunk Leia WIP 2 - right

Steampunk Leia WIP 2 - rear

Sorry about the inconsistent lighting on the photos. They were taken outside since I still need to obtain a decent photography setup. But at least they weren’t taken by my phone this time, so there’s that.

Please comment if you have any questions or comments. Critiques are always welcome and appreciated!

From the workbench: steampunk Leia, part 1

My current project is a steampunk version of a certain famous character.

Steampunk Princess, work-in-progress

Steampunk Princess, work-in-progress

This is actually the first bust I’ve painted, and has been a lot of fun so far because it’s a much bigger scale than I usually paint. My normal fare is 30mm models, which is about 1:60 scale. This bust is closer to 1:10 scale. It’s a lot of fun to be able to put in details like irises and eyelashes. The miniature is Steampunk Princess Bust, by Cool Mini or Not, cast in resin.

The color scheme (with the orange lighting effect) was inspired by a scene from Star Wars:

Princess Leia; image copyright 20th Century Fox

Image copyright 20th Century Fox; used without permission

The lighting effect is not too dramatic from this angle, but it’s much more dramatic from her left side. I’ll take some more photos from different angles when I’ve made a bit more progress. There’s still lots to do, not just the pistol!

Please comment if you have any questions or comments. Critiques are always welcome and appreciated!

Newer posts »

© 2024 Light Miniatures

Theme by Anders NorenUp ↑