These are some things I’ve learned that I think most miniature painters would benefit from keeping in mind when they paint. Anyone, even people who just started the hobby, can follow these tips.
Pay attention to where the light is coming from when highlighting and shading
Figures that are lit in a realistic fashion are much more believable than ones which are not. Everyone who can see develops an intuitive sense of how things are supposed to look, and when the lighting is off we will notice it and be bothered by it, even if we can’t put our finger on what the problem is.
When highlighting and shading, don’t just highlight the raised areas and shade the recesses, as this is not the way light actually works. Instead, decide where the light is coming from early in the painting process, and try to consistently and realistically light your miniature with that in mind. The three dimensional nature of miniatures is a huge boon here, as you can often just hold your figure at the right angle with respect to a lamp and use that as your guide.

A photograph to use as a guide can be useful, especially for more complicated lighting situations with multiple light sources. For just one light source, you can usually get away with just holding your mini at the right angle without taking a photo. Can you see where I deliberately highlighted some of recesses of the folds in his shirt, where they catch the light? Can you spot where I missed some?
Don’t just add white to highlight and black to shade, and don’t just use pre-mixed highlight and shadow colors
The light around you is constantly changing. Things look one way in the morning, another way at noon, and everything is beautiful during the golden hour in the late afternoon. This should influence the colors that you paint! When you paint a miniature, think about the ambient light conditions and the mood you want to set. In a cold environment, you might add blue to both the highlights and the shadows in order to set the appropriate mood. If you’re painting an alien on Mars, you might keep the highlights neutral in color, but add red to all of the shadows because of the color of the ambient light. Always keep the environment, lighting situation, and mood you want to create in mind when choosing colors.
Too often I see miniature painters who always paint elf skin with elf skin, elf skin highlight, and elf skin shadow, or who always highlight by adding white. I won’t tell you never to do this. In art, all rules are meant to be broken. But it should always be a choice made consciously, not unconsciously because that’s what the paint is called.
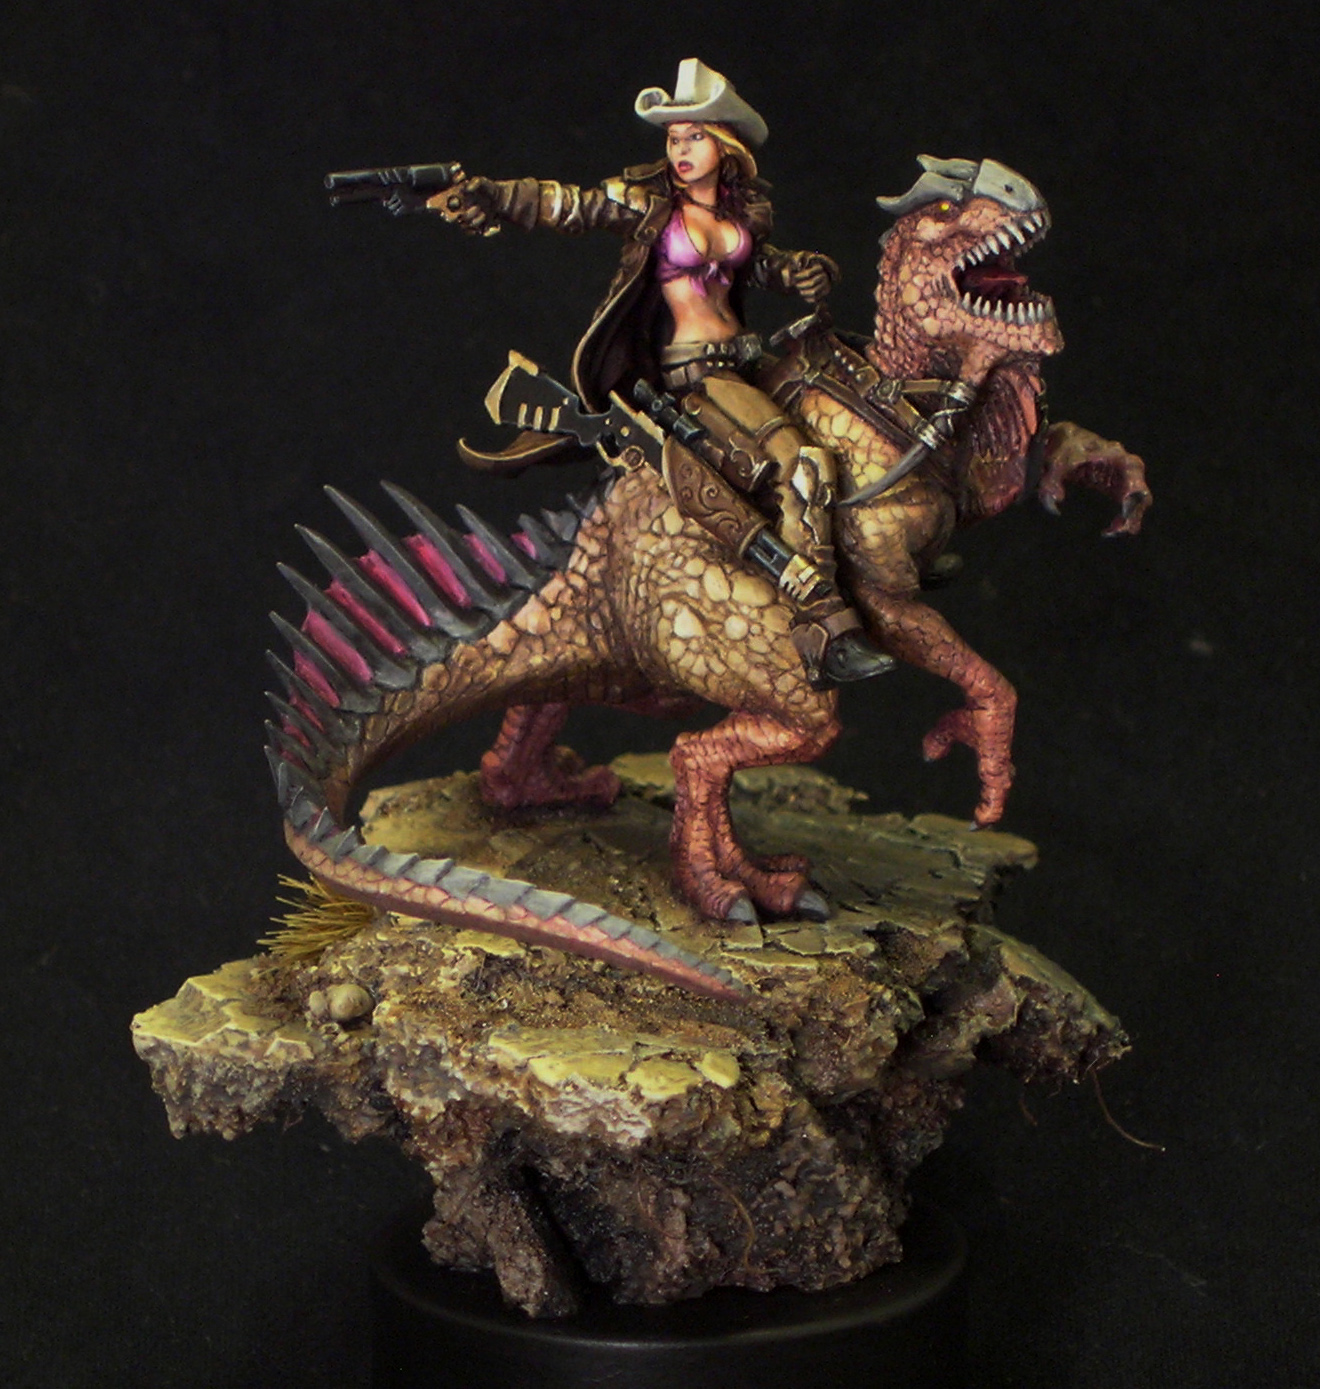
When painting Ruby, I set the scene during golden hour. Both the direction and the color of the light are appropriate for a sun which is low in the sky. For the parts of the model lit by the sun, I added yellow to all of the highlights. For the parts of the model facing away from the sun, I highlighted by adding gray.
Smooth blends are for smooth surfaces only
A lot of miniature painters obsess over making their blends as smooth as possible, and a lot of this is energy which could be better spent elsewhere. Smooth blends are for smooth surfaces, and most of the objects in our lives have other textures than that. If you are painting a silk kimono, a polished ceremonial suit of armor, or the skin of a pampered noble, then by all means try to make your blends smooth. But if you are painting a rough work garment, armor which has seen combat, or the skin of a warrior, your blends should not be perfectly smooth. Try to show the grain of the leather, the weave of the fabric, the varying structure of the stone, the lines and scratches from wear, where the paint has started to chip, where corrosion has beset the metal. These are more interesting to look at, and more fun to paint, than smooth blends on every surface.
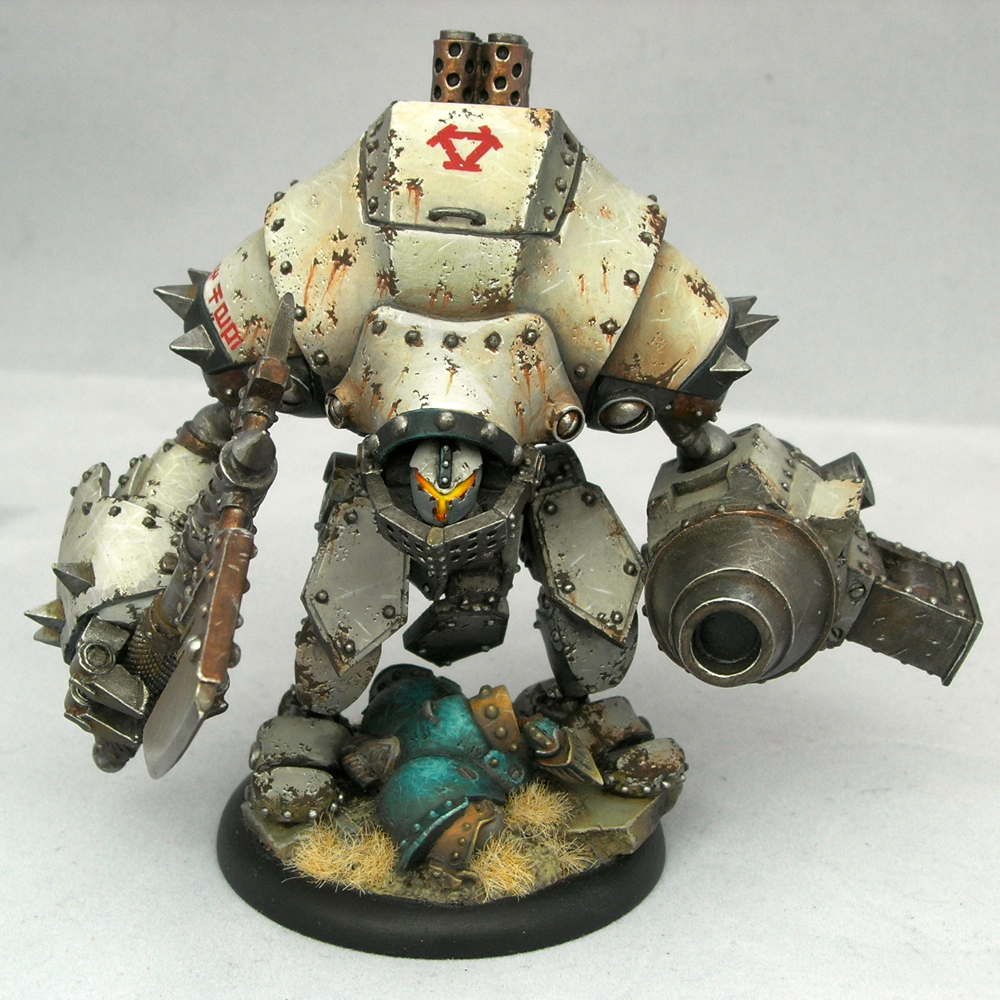 Do you see any smooth blends? Of course not! This ‘jack has been through years of war; there are no smooth surfaces left. As I was creating the lights and shadows in the white armor, I did a lot of sketchy blending and left a lot of “bathtub ring” effects where an edge of paint dried. If you do this once or twice, it looks like a mistake, but if you build up a texture out of it, it just looks like weathering. For the turquoise ‘jack, I created an entirely different texture by highlighting with a lot of short lines of color.
Freehand is not hard
Some freehand is hard. If you’re trying to paint something which needs to be very detailed, very regular, or perfectly symmetric, you need to have good brush control. On the other hand, there are a lot of good uses for freehand that are not challenging to pull off. For example, try a cherry blossom pattern, rough graffiti, or something totally abstract. Even a simple border can add interest without being difficult to paint. As you get experience with easier bits of freehand, you can move on to more technically challenging subjects.
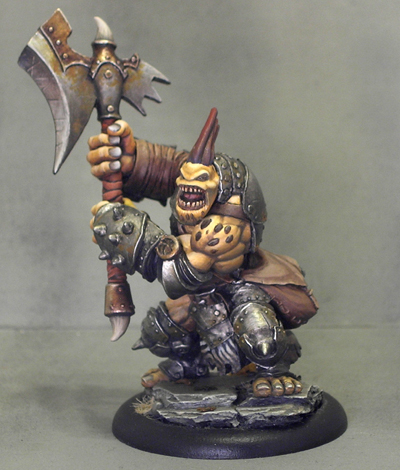
The zebra-skin loincloth on this axer was super simple to do. It’s just a series of lines, and they aren’t supposed to be straight or the same width.
Great advice, Althai!
Spectacular Tips and advice you are a very talented painter and I find your attention to details in shadows and aging/distressing of the miniature figures to be very interesting would honestly enjoy watching the creation process on one of your next projects. Robbie #10